Open data portal user guide - non-publishing functions
Last updated: 20/10/2021
Contents
Managing Dataset and Data Request Comments
Adding a Data Request (all users)
Managing Data Requests (Editor or Administrators Only)
Accessing Engagement Reports (Administrators Only)
Accessing Admin Reports (Administrators Only)
Applying for access to publish to the open data portal
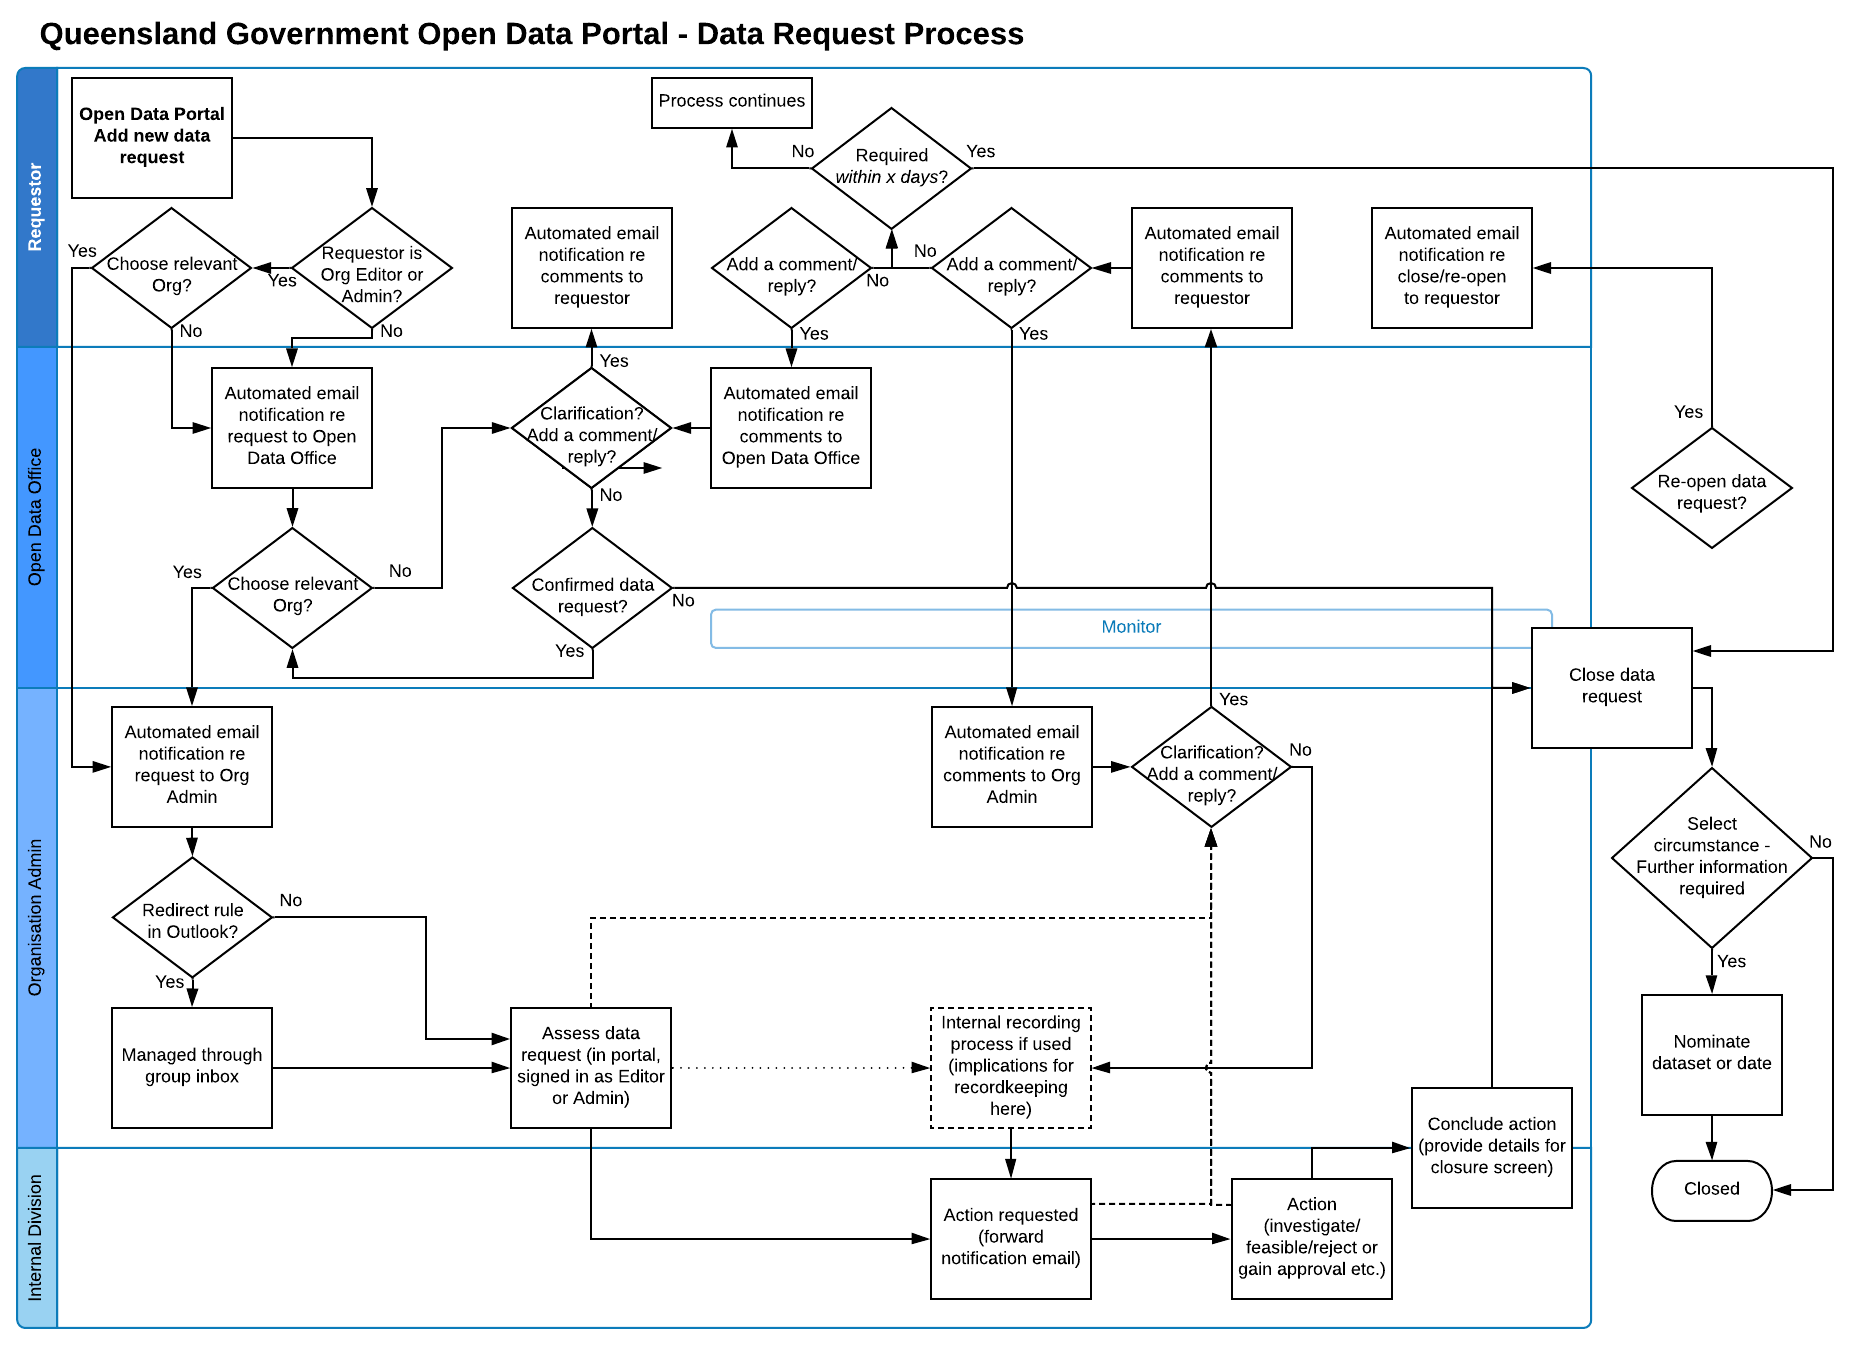
Attachment 1 – Normal Data Request Process
Attachment 2 – Detailed Data Request Process
Introduction
The Queensland Government open data portal uses a CKAN platform. Implementations of this platform vary so this user guide has been created to assist users with the specific functions provided. For more advanced features, which may be enabled but not referred to in this guide or the Open data publishing guide, please refer to the CKAN documentation.
Open Data Portal Roles
There are five roles that exist for registered users of the open data portal, namely: General users, Members, Editors, Administrators and System Administrators. Different functionality is available to each of these roles. An additional entity is added to the role list, namely users that have either not registered or have not signed in. These users have access to only the base-line functionality.
- Unregistered/not signed in user:
- Viewing all general pages in the open data portal;
- Viewing datasets and searching and filtering dataset lists;
- Viewing and downloading resources; and
- Viewing lists of available filtering options (Organisations, Groups, Tags, Formats and Licences).
- General User (default upon registering):
- Baseline functionality; plus
- Adding a data request;
- Make comments/replies on data requests and datasets; and
- Flag inappropriate comments on data requests and datasets.
- Member:
- General User functionality; plus
- View private datasets and associated resources for which their organisation is the custodian.
- Editor:
- Member functionality; plus
- Add new and edit existing datasets and resources on behalf of their organisation;
- Add datasets to Groups;
- Edit, un-flag or delete comments where the related dataset or data request is associated with their organisation;
- Batch change Visibility of datasets from Private to Public and vice versa; and
- When creating a data request, assign the request to an organisation.
- Administrator:
- Editor functionality; plus
- Management of data requests (close, re-open, re-assign) assigned to their organisation;
- Access to Engagement Reporting for their organisation; and
- Management of Admin, Editor and Member access within their organisation.
- System Administrator: Reserved for technical staff tasked with maintaining the system.
Roles are assigned based on a user’s functions with respect to the portal. The process for seeking the allocation of an Editor role is covered in Applying for access to publish in the open data portal. For the allocation of Member or Administrator roles, please contact the open data representative within your organisation.
Managing Dataset and Data Request Comments
General Information
A comment, and any subsequent replies, are called a ‘thread’. There is no facility to reply to a reply, so where this is desired, a user should make further replies under the thread.
For general registered users, saved comments cannot be edited or deleted.
When attempting to save a comment or reply, the text is scanned for profanity and other abusive language, and where detected, the comment is not saved.
Reviewing outstanding Dataset and Data Request Comments (Organisation admin only)
Members, Editors or Administrators should provide an (at least initial) response to a commentor seeking information or expecting a response, within 5 working days. To enable tracking of response delays, the Engagement report includes links to any dataset or data request comments for a given organisation that have not had at least one reply in the thread for greater than 10 days since posting and greater than 60 days since posting.
Please refer to the Accessing Engagement Reports section of this manual for more information.
Responding to Dataset and Data Request Comments (any registered user)
Members, Editors and Administrators, please provide an (at least initial) response to a commentor seeking information or expecting a response, within 5 working days.
- Log in to your account
- Follow the link from the email notification advising that a relevant comment has been made
- The relevant comment will be highlighted
- Review the comments or feedback
- Provide a reply by clicking the Reply button under the relevant comment
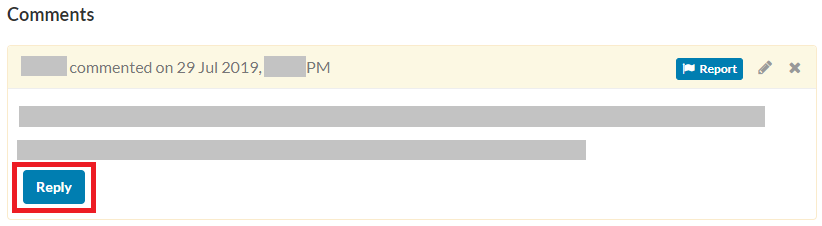
- Type a reply in the Comment field (mandatory)
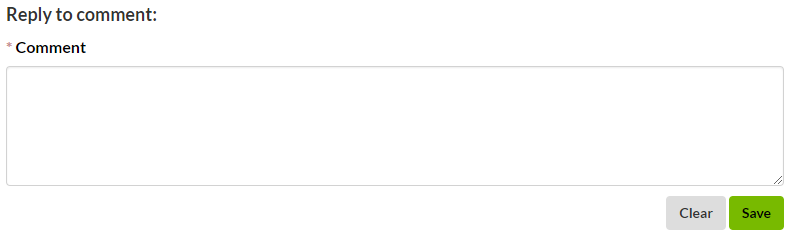
- To clear the contents of the Comment field, use the Clear button at any time before saving
- To exit the comment without posting, click or navigate out of the page without clicking the Save button
- To post the comment, click the Save button
Unless the thread has been intentionally muted, the commentor (along with any comments or thread followers) will be sent an email notification that a reply has been made to the comment
Posting Comments to Datasets and Data Requests (any registered user)
As a Member, Editor or Administrator, if there is general information (not replies) that you would like to share with dataset or data request viewers or dataset followers that is more appropriately placed in the comments area, rather than within the description, at the bottom of the dataset under Add a comment or provide dataset feedback or for data requests, under Add a comment:
- Log in to your account
- Navigate to the dataset and scroll down to the comments
- In a data request, select the Comments tab

- Complete the provided fields under Add a comment…
- In the Subject field (non-mandatory), type a subject
- In the Comment field (mandatory), type the message you wish to share
- To clear the contents of the Comment field, use the Clear button at any time before saving
- To exit the comment without posting, click back or otherwise navigate out of the page without clicking the Save button
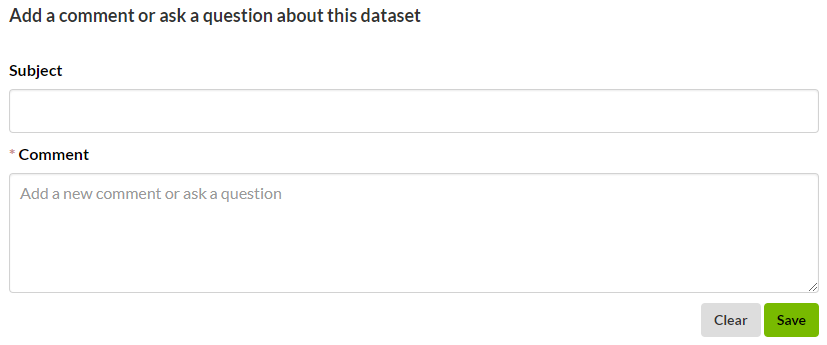
- To post the comment, click the Save button
With the exception of the data requestor (unless they have purposely chosen to mute the comments or threads), only users that have purposely chosen to follow the dataset or data request comments will receive email notifications about added comments.
Editing Dataset and Data Request Comments (Editors and Administrators)
- Log in to your Editor or Administrator account
- Navigate to the dataset and scroll down to the comments
- In a data request, select the Comments tab near the upper-middle of the page
- Within the relevant comment, click on the pencil icon

- Modify the wording in the Subject and/or Comment fields
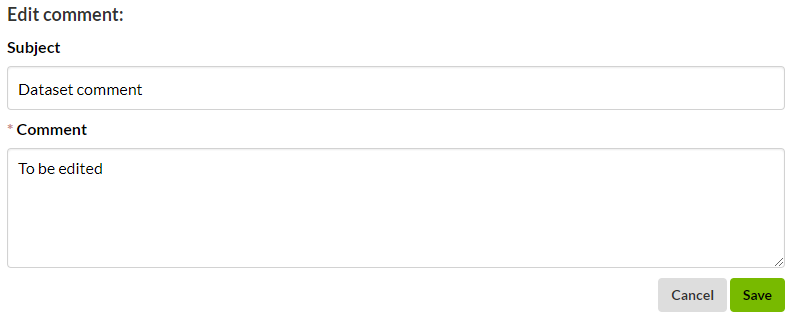
- Click Save to post the edited comment
- To exit the comment without posting, click the Cancel button at any time before saving.
Moderating Flagged Dataset and Data Request Comments (Editors and Administrators)
Any registered user is able to flag a comment as inappropriate. Doing so generates an email notification to the Administrator/s of the organisation which is the custodian of the dataset or which is currently assigned the data request. Editors have the same level of access to moderate the comments and may assist if required. The flagged comment should be resolved within 5 working days. To resolve a flagged comment:
- Log in to your Editor or Administrator account
- Follow the link from the email notification advising that a comment has been flagged.
- The flagged comment will be highlighted

- Review the comment to determine the required course of action considering the data.qld.gov.au Comment Policy (currently only in draft)
- Where the comment is not inappropriate, click the Un-flag button for this comment
- Where the comment contains inappropriate language that can be corrected through editing yet retain the otherwise appropriate meaning, click the pencil icon
 for this comment and edit (edited comments are publicly noted as such)
 - Where the comment is assessed as inappropriate but it cannot be corrected through editing, click the X icon
 for this comment to be deleted (deleted comments are publicly noted as such with the text remaining visible to associated organisation Editors and Administrators only).
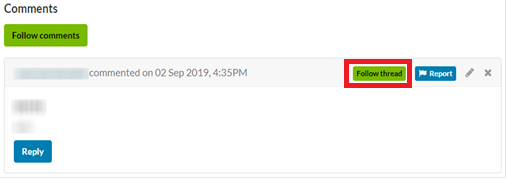
Follow comments and threads
Registered users may follow comments for a dataset or data request or for a specific thread. This causes email notifications to the registered user’s email address advising of the posting of a comment. By default, a data requestor is following all comments and the author of a comment or reply is following the thread.
- Log in to your account
- To follow all comments for a dataset or data request, click on the Follow comments button
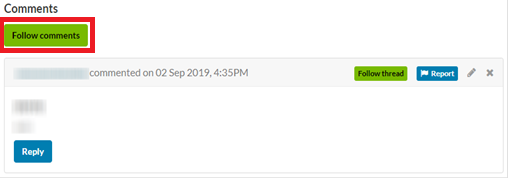
- To follow only a thread, click on the Follow thread button
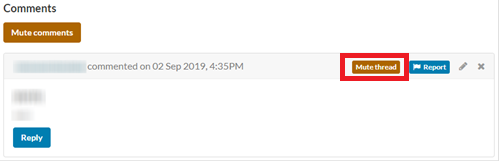
Mute comments and threads
Registered users may mute all comments for a dataset or data request or for a specific thread. This blocks the sending of email notifications to the registered user’s email address advising of the posting of a comment.
- Log in to your account
- To mute all comments for a dataset or data request, click on the Mute comments button
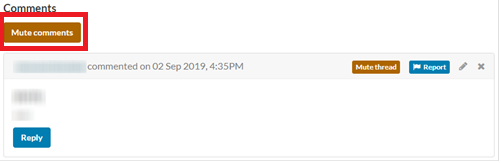
- To mute only a thread, click on the Mute thread button
Adding a Data Request (all users)
- Click Request data in the top right corner of the page

- A user must be logged-in to add a data request and can do so by clicking Login to create a data request button
![]()
- A logged-in user can add a data request by clicking on the Add data request button
![]()
- Complete the provided fields under Create data request:
- Give the data request a subject
- Add a description to explain the data request
- Helper text is provided to guide the user to enter the type of information that is useful to those considering the request
- Registered users possessing a Member, Editor or Administrator role (Queensland Government internal users) will have the ability to assign the request to the appropriate organisation.
- (for Queensland Government internal users only) Select the appropriate organisation from the ‘Organisation’ drop-down list
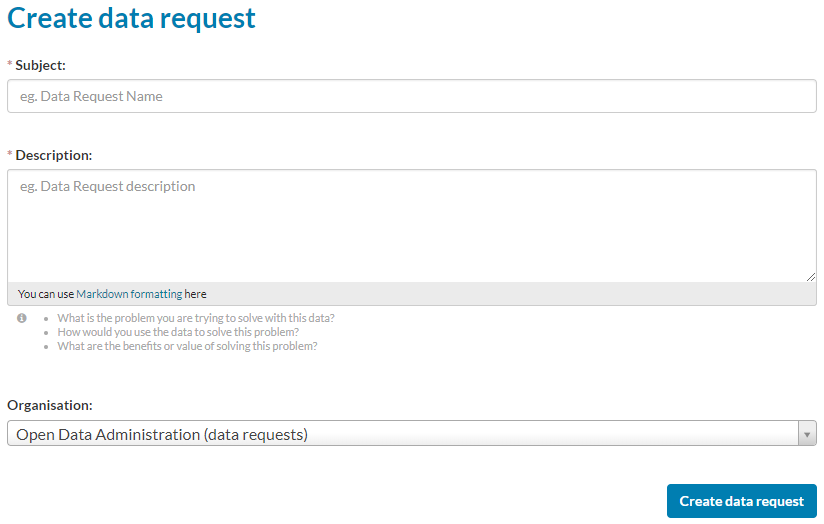
- Click the Create data request button to submit the request
Managing Data Requests (Editor or Administrators Only)
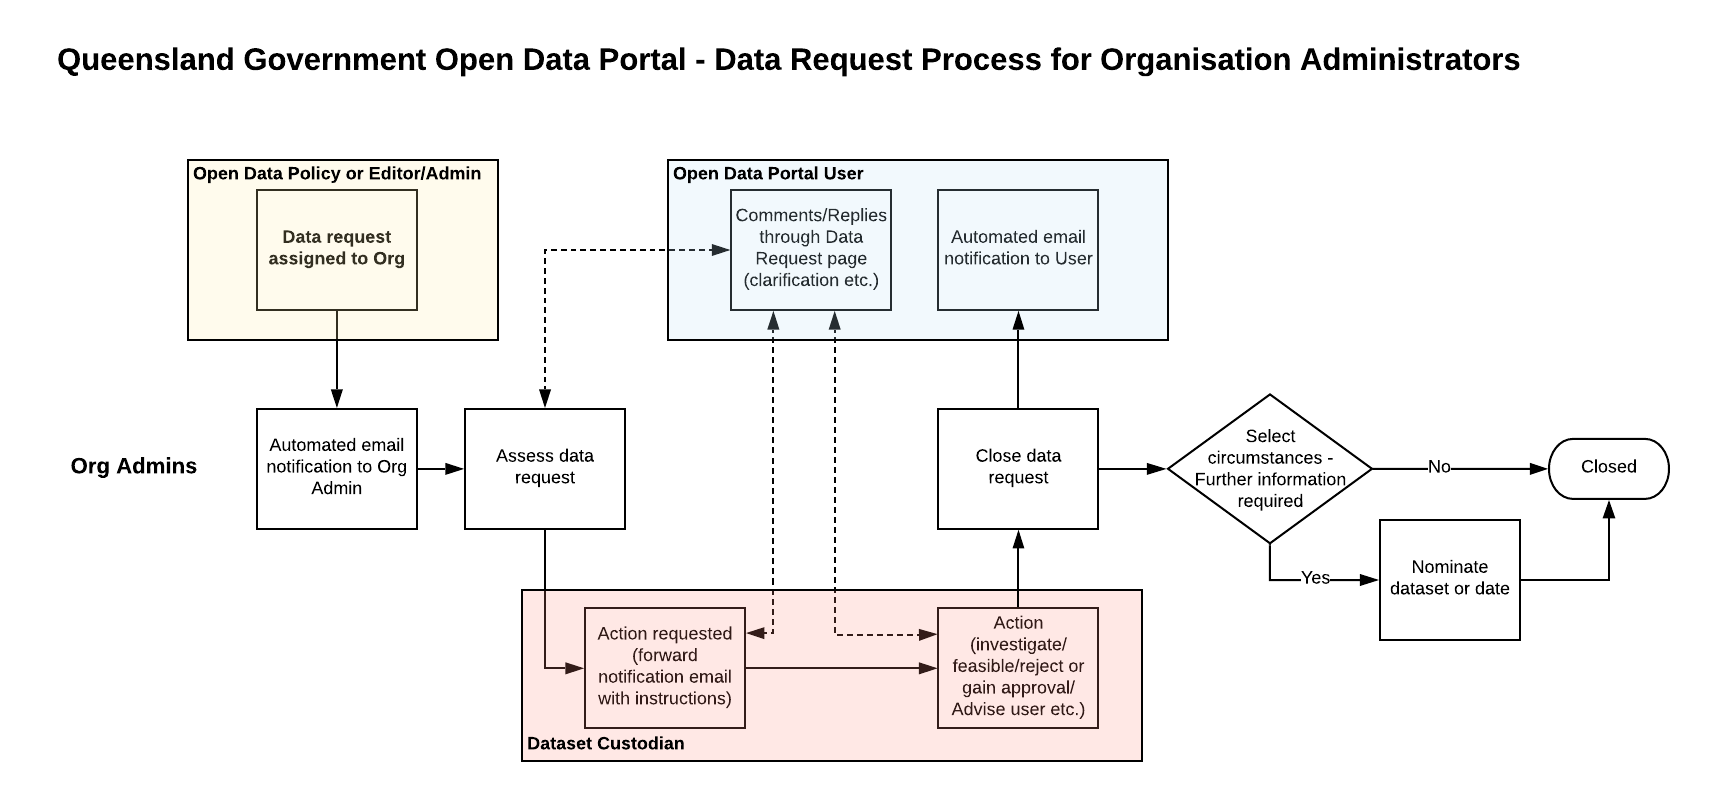
Data requests allow registered users to ask for data that is not currently available. The basic flowchart of the normal data request management process (pictured below) is included as Attachment 1. The overall, more detailed flowchart of the data request process is included as Attachment 2.
Editors and Administrators, please provide an (at least initial) response to a data requestor within 5 working days.
Responding to a data request
- Log in to your Editor or Administrator account
- Follow the link from the email notification advising that a data request has been assigned
- Click on the Comments tab near the upper-middle of the page
![]()
- Complete the provided fields under Add a comment
- It is not mandatory to add a Subject although it may be appropriate depending on context
- Type a response in the Comment field (mandatory)
- Click on the Save button to post the comment (the data requestor will be sent an email notification advising that a comment has been posted)
- All comments will be visible to the public. In the unlikely event that a private conversation is required, contact Open Data Policy
Reassigning a data request
- Log in to your Editor or Administrator account
- Follow the link from the email notification advising that a data request has been assigned
- Click on the Manage button
![]()
- Select the appropriate organisation from the Organisation drop-down list
![]()
- Click the Update data request button to complete the reassignment
![]()
(the admin/s of the organisation from which the request has been re-assigned will be sent an email notification advising that the ‘…data request has been assigned away from your organisation’)
Closing a data request (Organisation admin only)
- Log in to your Editor or Administrator account
- Follow the link from the relevant email notification or locate the data request
- Click on the Close button
![]()
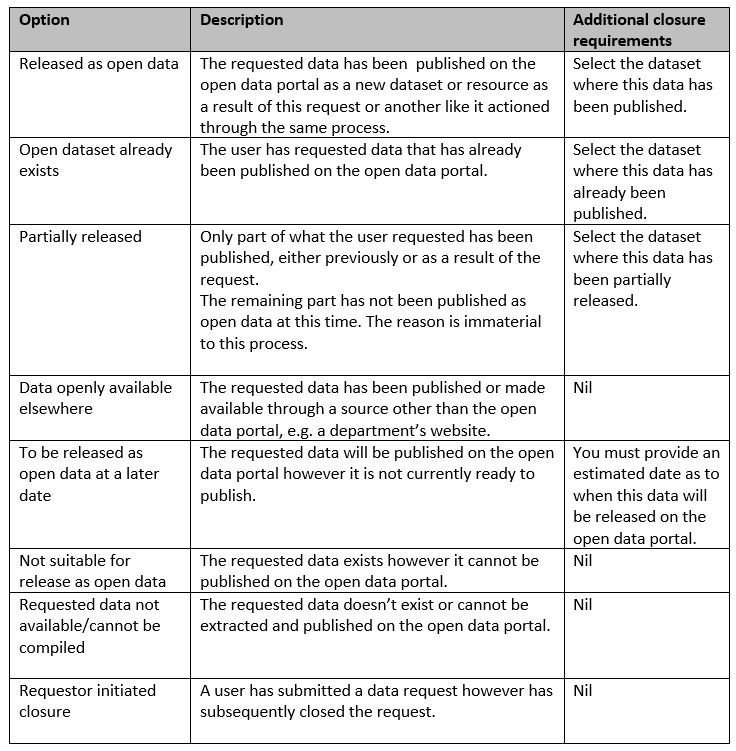
- Select the most suitable circumstance from the provided drop down list
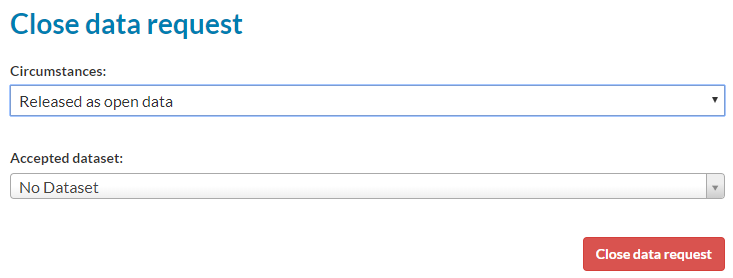
- The selection made in the Circumstances field may cause another field to appear, either requiring the nomination of a relevant Accepted dataset or an Approximate publishing date
- If prompted to nominate an Accepted dataset, search for and select the relevant dataset
- If prompted to nominate an Approximate publishing date, either use the date selector or type in a date
- A description of the closure circumstances has been defined below. In certain circumstances, where appropriate, an explanatory comment should also be made to explain the data request closure.
- Click the Close data request button (the data requestor will be sent an email notification advising that the data request has been closed)
- Log in to your Editor or Administrator account
- Open the data request email notification or navigate to the appropriate data request
- From the email notification, click on the hyperlink to display the data request
- Click on the Re-open button
- Clicking on the Request data button in the top right corner of the window
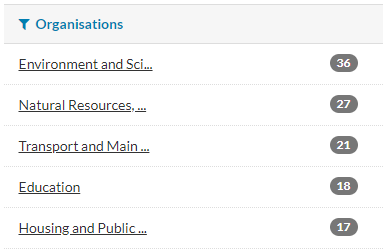
- Filter to a given Organisation in the left panel
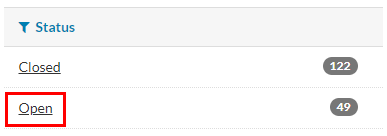
- Filter to the Status 'Open' in the left panel
- Log in to your Administrator account
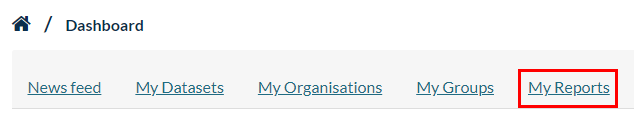
- Click on the dashboard icon at the top right of the window
- Click on the My Reports tab which will display the report options
- Click on the Engagement report button to display below this the Engagement report options
- Clicking the Export button will compile and download a CSV file containing all relevant data for organisations for which you are an Admin

- Select the relevant organisation
- The filter allows the selection of a specific date range if desired. Note: the commencement date for collecting data request and comments data is 10/07/2019. Data request closure 'Circumstances' data commenced 6/10/2020.
- Click on the Show button to display the table with the filtered data

- Log in to your Administrator account
- Click on the dashboard icon at the top right of the window
- Click on the My Reports tab which will display the report options
- Click on the Admin report button to display below this the Admin report options
- Clicking the Export button will compile and download a CSV file containing all relevant data for organisations for which you are an Admin
- Select the relevant organisation
- Click on the Show button to display the table with the filtered data
- Go to the Self-publishing account request form located here: https://www.forgov.qld.gov.au/request-publishing-access-data-and-publications-portals
- Complete and submit the online form ensuring that the Data Portal checkbox is ticked (if relevant, access can also be requested to the Publications Portal)
Upon submission, the completed form will be automatically emailed to your nominated supervisor for approval with instructions to reply to the email. The receipt of this reply email will automatically generate a task with the appropriate team for the creation of the user profile and the assigning of the appropriate profile.
Re-opening a data request (Organisation admin only)
![]()
(the data requestor will be sent an email notification advising that the data request has been re-opened)
Reviewing outstanding Data Requests (Organisation admin only)
Editors or Administrators should provide an (at least initial) response to a data requestor seeking information or expecting a response, within 5 working days from the assignment of the request to their organisation.
All users can access the data requests for a given organisation by:
To enable tracking of outstanding data requests and response delays, the Engagement report includes links to any data requests for an Admin's organisation that have been open for greater than 60 days and those data requests that have not had at least one comment in the thread for greater than 10 days since the request was made.
Please refer to the Accessing Engagement Reports section of this manual for more information.
Accessing Engagement Reports (Administrators only)
The Engagement report is an internally visible document only, limited to Admins of organisations. It compiles data relating to user engagement for datasets, organisations, comments and data requests, and includes links to those comments and data requests that fit certain criteria to enable further review and subsequent action.
The Engagement report can be found at https://data.qld.gov.au/dashboard/reporting or through the following set of steps:

If you wish to view the data through the web page, only one organisation's data will be displayed at a time in the table. The filter will default to the first organisation (alphabetically) to which you are an Admin.
Accessing Admin Reporting (Administrators only)
The Admin report is an internally visible document only, limited to Admins of organisations. It compiles data relating to dataset currency and information relating to privacy, and includes links to the datasets that fit certain criteria to enable further review and subsequent action.
The Admin report can be found at https://data.qld.gov.au/dashboard/reporting or through the following set of steps:
If you wish to view the data through the web page, only one organisation's data will be displayed at a time in the table. The filter will default to the first organisation (alphabetically) to which you are an Admin.
Applying for access to publish to the open data portal
Users assigned responsibility for publishing datasets to the open data portal require an appropriate user profile and role before they will have access to publish.
Attachment 1 – Normal Data Request Process
Attachment 2 – Detailed Data Request Process